
Building Realistic Software Simulations with Advanced Scenarios in Adobe Captivate

Have you ever wanted to teach someone how to use software without sitting by their side the whole time? Adobe Captivate makes this possible. It allows you to record your actions on the screen and turn them into a fully interactive learning experience. Whether you want to show someone how to browse a website, fill out a form, or navigate a complex tool, Captivate has you covered.
Finally, you’ll understand how to build a software simulation, add visuals and interactive elements to make it look polished, and deliver a course that feels realistic and engaging.
What is Software Simulation?
A software simulation is like a recorded run of an application. Adobe Captivate watches what you do on the screen – your mouse clicks, keyboard inputs, and navigation – and turns it all into an interactive eLearning course.
The student then views the lesson and can view what he has done, practice himself, or be tested on it. It’s a safe, controlled way for people to learn software without touching the actual application.
Three Ways of Imitation
Before you start recording, you need to decide what kind of simulation you want to create. Captivate offers three modes, and you can record all three at once.
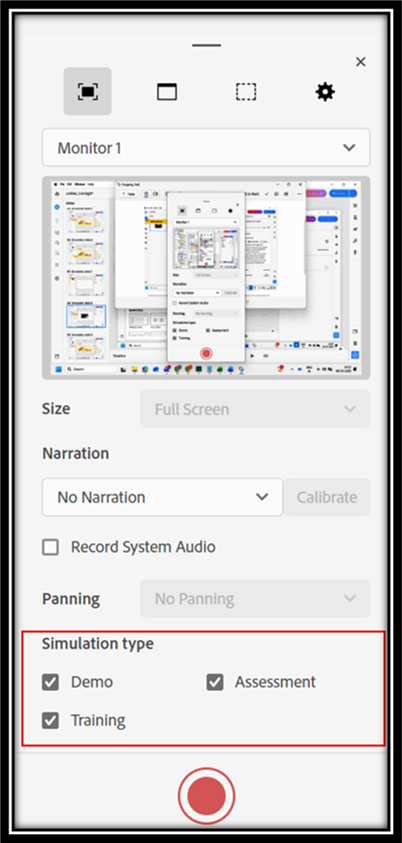
Demo mode to show you. The student watches you complete the task without having to do anything yourself. Captivate automatically adds text captions that describe each action as it happens. This is great for quick presentations or if you just want someone to see how something works.
Training Mode for practice. Here, the student must engage with the analogy. They have to click on the right places, and if they don’t get it right, a helpful message appears telling them to try again. The strategy also appears when it wanders near the right place. This mode builds confidence before students go to the actual application.
Test mode for testing. It works like Training Mode but without hints. Check the user experience with the process. Notify the user only if the step is not performed correctly.
Setting Up Your Simulation
To get started, open Adobe Captivate and click New Casting on the welcome screen. A startup dialog will appear when you select whether you want to record your screen.
You have three recording window options. Take full screen records your entire monitor – useful if your workflow covers the entire screen. If you have two monitors, you can choose which one to use. Program Window reduces recording to a single open application, keeping things focused. Custom Size it allows you to define your width and height if you need something specific.
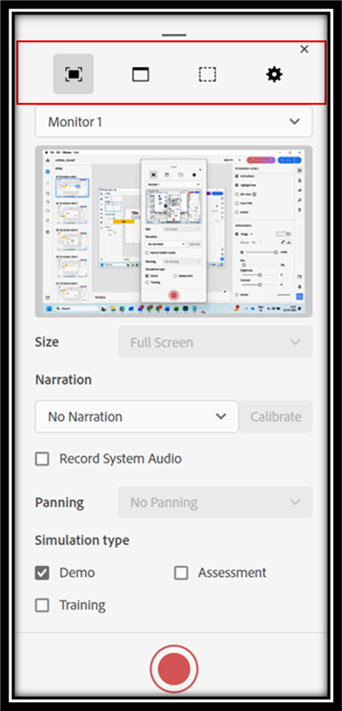
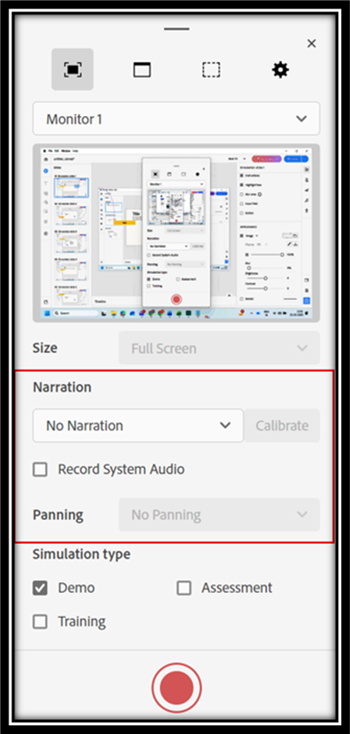
Once you’ve chosen your window type, you can also set up narration by selecting the microphone, and turn on panning if your screen is large. Panning allows the recording window to follow your mouse so nothing gets cut off. You can set it to run automatically or manually.
Recording Pod
When recording starts, a small toolbar called i A recording pod appears in the lower right corner of your screen. You can drag it anywhere – it won’t affect your recording.
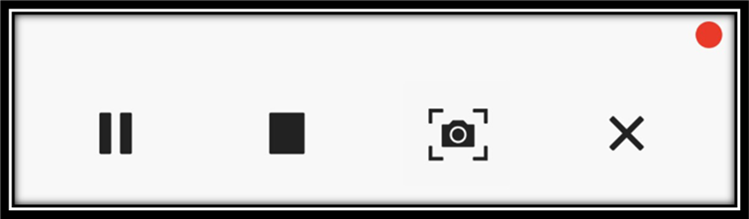
A blinking red dot on the pod tells you that recording is active. The pod gives you four controls. Play/Pause allows you to pause and resume recording. Wait ends the session – you can press again Cmd + Return on a Mac or Finish it key to Windows. Take a screenshot takes a snapshot of the manual at any time and adds it as a slide to your project. Cancel ends recording without saving anything.
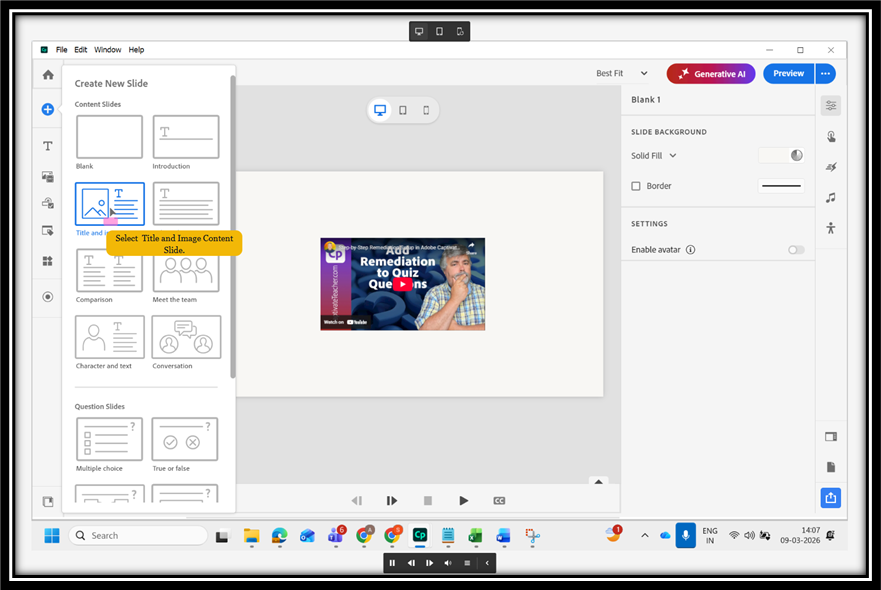
Developing Slides with Shapes and Components
Once your recording is complete, Captivate creates a series of one slide for each key action you used. These slides look like screenshots of the software you recorded. But here’s where it gets fun: you can add visual shapes and interactive elements to each slide to make the simulation richer and more realistic.
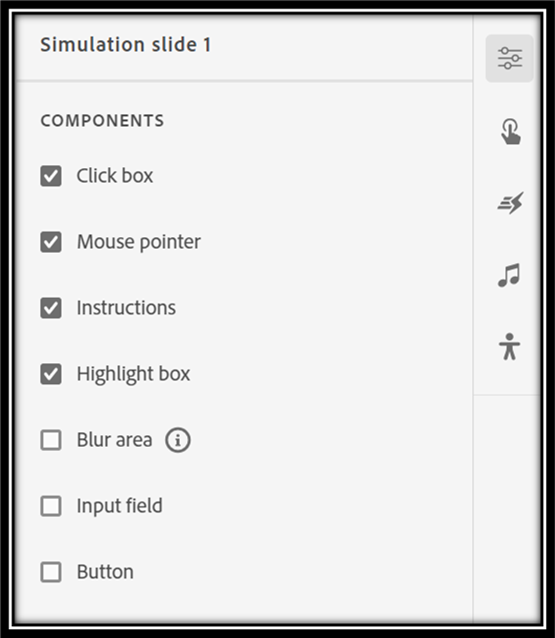
Of Material things panel, under the Parts section, you will find several elements that you can place on any slide.
A click box is an invisible area on a slide that the reader must click to go to the next step. Think of it as a hotspot. You can place it over a button, menu, or any area of the screen. In training and test modes, click boxes are automatically created based on where you clicked during the recording. You can also add or edit them yourself.
The mouse pointer indicates the path the cursor takes between actions. By default, Captivate draws a soft curved path, which looks natural and human. But you can switch to a more direct way if that better fits your workflow – for example, if you’re quick-clicking through a toolbar.
You can also change the appearance of the pointer, make it bigger or smaller, add a click animation (a quick burst of color that highlights where the reader clicked), and change or mute the click sound.
Instructions are text boxes that appear on the slide to guide the reader. You can add up to three command blocks per slide. They are very good at telling students what to do next. Once you’ve chosen an order, you can fully customize it – change the background color, add a border, adjust the shadow, and control the brightness to blend in perfectly with the slide. You can even drag it to a different place on the screen.
A highlight box is a colored rectangle that draws the reader’s attention to a specific part of the slide. It is automatically added to the places you clicked during recording. You can save it, delete it, change its size, change its color, add a gradient fill, or apply a shadow. Adjusting the opacity makes it more or less visible depending on how subtle you want it to be.
If your screen recording has captured any sensitive information – such as a personal email, password, or phone number – a local encryption tool is your best friend. You add a blur shape to that region, and it hides the information from the reader.
You can control how strong the blur is using the intensity slider. The shape can be a rectangle or a circle. You can also adjust the corner radius to soften the edges and add a border around it. All of these controls are available in the Visual Properties panel after selecting the dimming component.
The input field allows students to type an answer directly on the simulation slide. This is useful if you want to simulate filling out a form or entering a search query.
Buttons are clickable elements that you can add to simulation slides. They can take students to the next slide, trigger a specific action, or navigate to another part of the course. They improve interaction and give students more control over their experience. You can add multiple buttons to a single slide.
All of these settings are in the Visual Properties panel under Appearance and Settings. When you’re happy, click Use on all slides to update every slide in your project at once.
Changing the Background Appearance
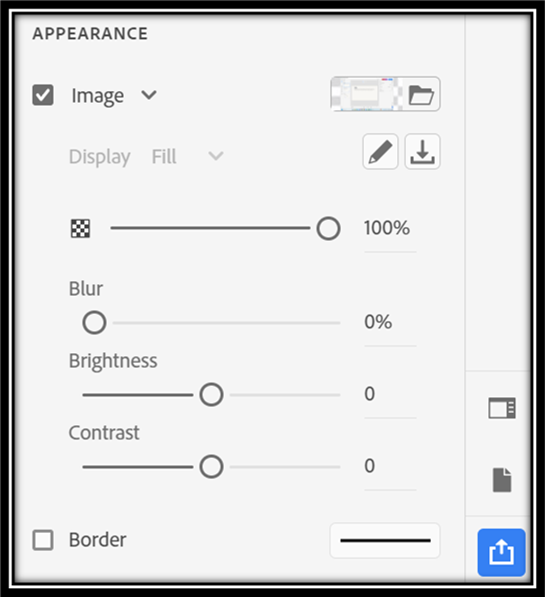
Beyond the shape and components, you can also change the way the background of the slide looks. Of Appearance section, select the image gradient to apply a solid color fill or gradient to the background. Or choose an original image from your computer or from Captivate’s built-in stock library. You can crop the background image, add a border around it, or download it.
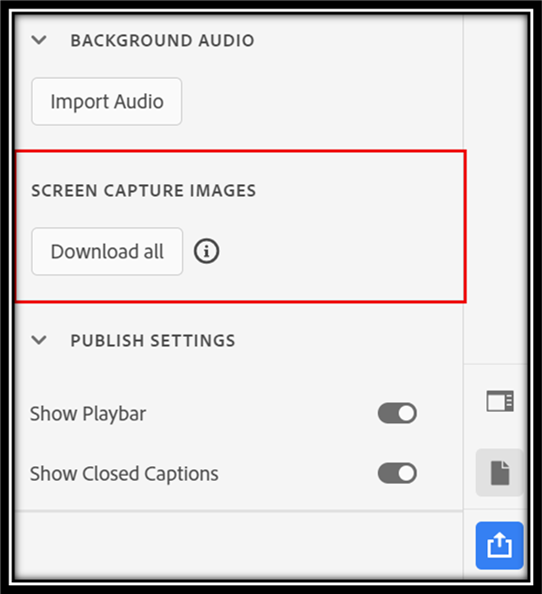
If you want to save all the background images in your project at once, go to Project structures on the right toolbar and click Download all images – Captivate will save them all in a folder on your computer.
Full Motion Recording for Smooth Actions
Some actions are difficult to capture with still screenshots. Dragging and dropping, scrolling through a list, or moving around over a menu may not look as good as a series of static slides. It is there Full Motion Recording (FMR) it helps.
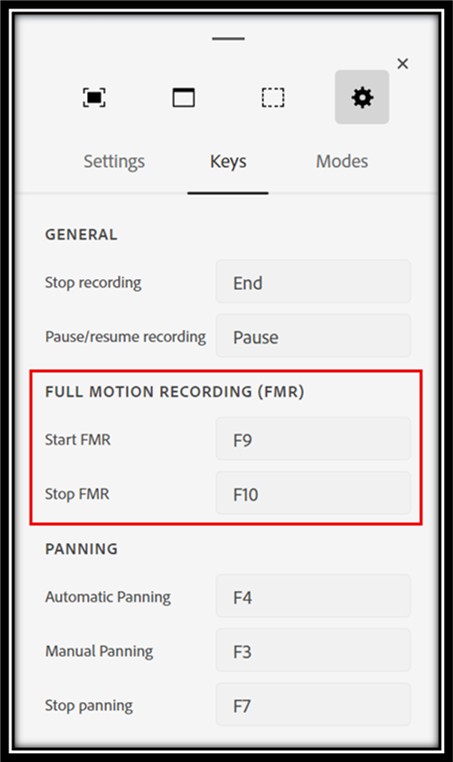
FMR records everything as a continuous video clip instead of individual screenshots. It works automatically when your mouse moves outside the recording boundary. You can also turn it on and off manually using keyboard shortcuts – Fn + F9 starting again Fn + F10 configuration in Windows, or Cmd + F9 again Cmd + F10 on macOS.
FMR slides appear in the timeline as videos. You can also add components such as click boxes and instructions to these video slides, just like regular simulation slides. The main difference is that FMR slides play like videos, while regular simulation slides are still images.
Adding Simulation to an Existing Project
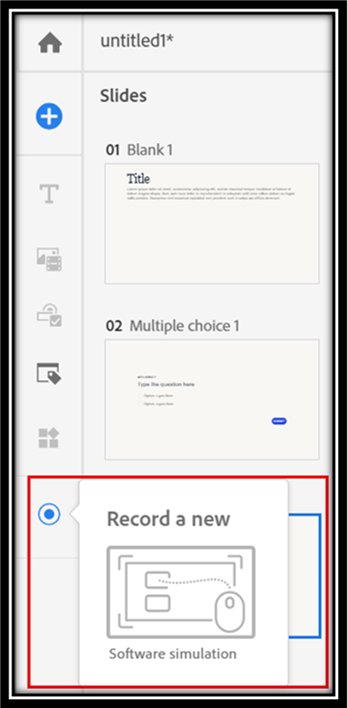
You don’t have to create a new project every time you want to add a simulation. If you already have a Captivate course, you can record a new simulation directly into it.
Open your existing project, click Download in the left toolbar, and select Software Simulation. The recording launcher will appear. Choose your simulation type, press Recordand when you’re done, new simulation slides are added right into your existing project.
One small thing to note: if your recording is smaller than 1366 × 768 pixels, Captivate puts it inside a standard-sized slide. If it is larger, the slider expands to match the recording size.
The conclusion
Adobe Captivate makes it incredibly easy to create professional looking and sounding software simulations. A combination of recording modes, visual effects such as bright boxes and dim areas, customizable instructions, and mouse pointer settings give you everything you need to create a realistic mirroring experience using real software.
Start with a simple demo, get comfortable with the tools, and explore Training and Testing methods to take your lessons to the next level. Once you see how much students benefit from being able to practice in a safe environment, you’ll never go back to plain screenshots or written instructions alone.


